Decades ago, a student came to my class wanting to learn how to practice Padmasana (Lotus Pose). At the time, I had long since ditched my class plans, realizing that my agenda was not always in sync with what students needed. So, on this particular day I improvised a class that built up to Padmasana. That led me to start thinking about focusing my classes around a peak pose.
Since then, I’ve taught many sequences that lead up to a peak pose. A peak pose is one that requires some specific preparation, and often lends itself to modifications. Let’s be clear that the value of our yoga practice never hinges on whether we can “perform” peak poses. But if you want to try practicing certain complicated poses, careful preparation is necessary.
How to Fashion a Peak Pose Sequence
When you want to focus on a particular peak pose, you must first break down its components. In other words, what are the physical characteristics of the pose that could pose challenges? Here’s an example:
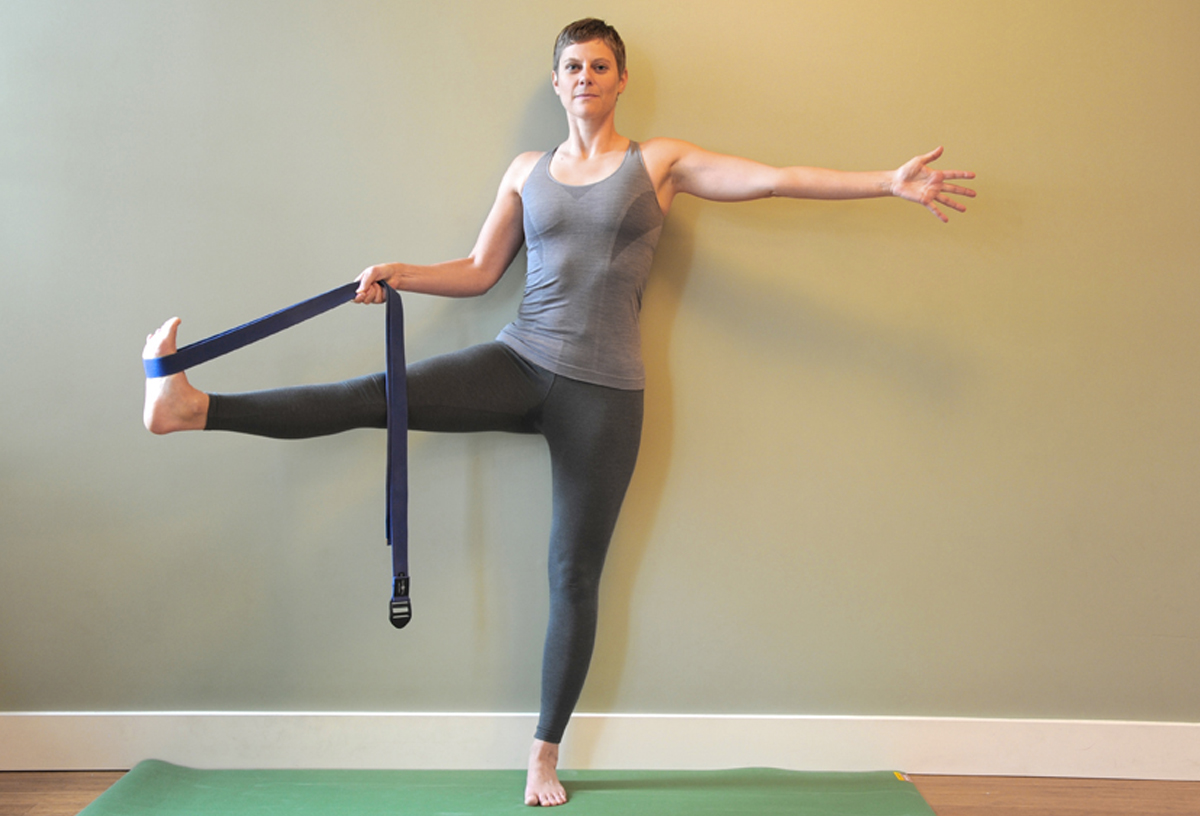
Today’s peak pose is Hasta Padangusthasana (Hand-to-Big-Toe Pose). Here’s a breakdown of the elements that you should practice before attempting this pose:
- Balance
- Hip abduction
- Hip external rotation
- Hamstring stretching
- Torso mobility and expansion
There are lots of poses that focus on these qualities. But I’ll provide a few examples here to help you get started. Once you shift your intention toward preparing for a peak pose, it can be a fun and educational puzzle to figure out how to put a unique sequence together.
Prep Poses for Hasta Padangusthasana
- Tadasana (Mountain Pose): Start by standing on a yoga mat in Tadasana. Beginning in Tadasana allows you to assess your starting point. Do you feel calm or agitated? Heavy or light? Dull or bright? Tired or energetic? It’s always helpful to tune into your baseline before you start a practice. Tadasana is a simple pose that gives you an opportunity to feel subtle sensation. Feel free to return to Tadasana in between poses to check in with any shifts that may have happened.
- Vrksasana (Tree Pose): Practicing a balance pose has two benefits here: you can assess how your body is balancing today, and balance poses can promote concentration, a necessary skill for balancing. Also, hip of the bent leg in Tree Pose is in abduction (moving away from the center line), the same position as the top leg in Hasta Padangusthasana.
- Prasarita Padottanasana (Wide-Leg Forward Bend Pose): This pose provides an easy way to practice strengthening and grounding the legs. It also stretches the hamstrings and abducts your hip joints. Root your feet into the floor and place your hands on the floor or on yoga blocks. Using yoga blocks, even if you’re very flexible, can promote easier breathing.
- Virabhadrasana II (Warrior II Pose): Warrior II combines balance, strength and hip abduction with an expanded profile. Make sure to breathe deeply. Practicing the pose several times on each side can help you build stability.
- Trikonasana (Triangle Pose): Trikonasana is similar in shape to Hasta Padangusthasana, but in a different relationship to gravity. Because both feet are contacting the floor, the balance challenge is greatly diminished. This gives you the opportunity to focus on the other elements: Hamstring stretch, external rotation, core mobility, and hip abduction. Mobilizing your core—so that your body can feel expanded and connected throughout—is easy here. Focus on breathing deeply, and make sure that you stay well within your range of motion so that your breath can be free and expansive.
- Hasta Padangusthasana (Hand-to-Big-Toe Pose): After practicing the previous poses, you should be ready to practice your peak pose. Feel free to stand with your back against a wall so that you don’t have to worry about balancing. That way you can focus on expansion. You can also practice with one side close to a wall, and place a few fingers on the wall to stabilize balance. If your hand doesn’t easily reach the foot of the extended leg, use a yoga strap to hold onto the foot. This will help you maintain expanded alignment.
