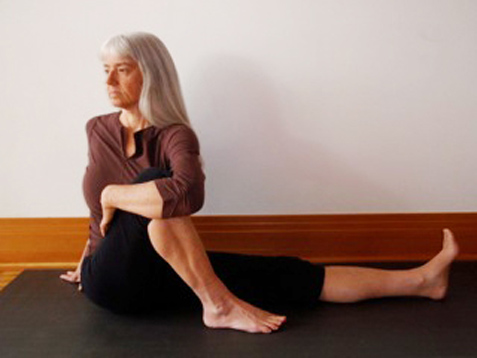
Many of yoga’s traditional asanas are inspired by Hindu mythology. Others, such as Parsvakonasana (Side Angle Pose), have very literal names. Today’s pose, Marichyasana (Marichi’s Pose), is named for the sage Marichi, who Yoga Journal calls “the great-grandfather of Manu (‘man, thinking, intelligent’), the Vedic Adam, and the ‘father’ of humanity.”
Marichyasana has many variations, some of which involve spinal twisting. The version of the pose I’ll describe here is a variation of Marichyasana III, but with a twist. Make sure that you warm up before attempting this pose. You can warm up by practicing poses that stretch the hamstrings and rotate the spine. There are, of course, lots of these classes of poses to choose from, but here are just a few suggestions:
Hamstring stretches:
- Adho Mukha Svanasana (Downward-Facing Dog Pose)
- Uttanasana (Standing Forward Bend)
- Supta Padangusthasana (Supine Big Toe Pose)
Spinal twists:
- Jathara Parivartanasana (Revolved Belly Pose)
- Parvrtta Sukhasana (Revolved Easy Pose)
- Parvrtta Trikonasana (Revolved Triangle Pose)
There are many benefits to practicing spinal twists in general. Here are a few that come from general spinal twisting and some that are specific to Marichyasana:
- Stretches the spine and the back muscles.
- Increases the flexibility and strength of the spine and back muscles.
- Loosens shoulder muscles.
- Massages the internal organs and glands.
- May help to relieve fatigue.
As with all poses, there are cautions to practicing twists, including seated twists. Do not practice twists in general if you are in the first trimester of pregnancy. Also, take care in this pose if you have diagnosed disc disease or back problems in general.
How to Practice Marichyasana
- Begin by sitting on a yoga mat with your legs extended straight out in front of you.
- Place a few fingers on your lumbar spine. If you feel the spinous process poking out like knobs in your lower back, place a firm folded blanket under your hips so that your hips are higher than your legs. Again feel your spine. Keep elevating your hips until your low back no longer feels knobby. (When the spinous processes are poking out, your lumbar is in flexion. This is not a healthy position from which to twist your spine.)
- Let the weight of your torso release into your sit bones. Ground the back of your right leg and bend your left knee, drawing the foot back toward your left sit bone. Place the sole of your left foot on the floor so that the inside of your foot is about four inches from the inside of your right thigh.
- Scoot your right sit bone forward and your left sit bone back a bit, so that your sit bones are on a diagonal. (Some yoga methods will tell you to keep the sit bones aligned, but I’ve found that this can, over time, create instability in the sacroiliac joint. Take it from a yoga elder with an unstable sacroiliac joint!)
- Ground both sit bones and rotate your torso toward your left knee, sliding your right leg forward even more as you turn.
- Hook your right arm around your left knee, or place your right elbow on the outside of the thigh. Place your left hand on the floor behind your left hip. Press the left hand into the floor to help lengthen your spine upward. Relax your shoulders. Make sure you are not using your right arm to force yourself into the twist.
- Don’t go to your maximum twist. Breathe deeply. Notice how your body wants to move as you breathe. On either the inhalation or the exhalation, your body will want to increase the spinal rotation. Likewise, on either the inhalation or exhalation, your body will want to retreat from the spinal rotation. I’m not being directive here because different individual bodies respond differently to inhaling and exhaling. When you suppress these movements, you suppress your breathing.
- Take five to ten deep, nourishing breaths, letting your torso unwind into the rotation. Feel your abdominal organs, especially your liver, stomach and spleen, and allow them to settle into the twist along with your rib cage, spine and core muscles.
- After five to ten breaths, rotate back to center and stretch your left leg out onto the floor. Sit for a few breaths and be present with what you feel in your body. Relax.
- Repeat on your second side.
Updated article from May 11, 2010
