Forward bends have a reputation for drawing us inward and encouraging introspection. While I doubt there’s scientific proof of this, practitioners report that these poses have a calming effect. Practicing forward bends, such as Janu Sirsasana (Head-of-the-Knee Pose), Paschimottanasana (Seated Forward Bend Pose) or Upavista Konasana (Seated Angle Pose) toward the end of an asana practice may even help us internalize and integrate the poses that came before. Forward bends can help our bodies wind down and slide effortlessly into Savasana (Final Relaxation Pose).
Forward bends are said to confer the following benefits:
- calm the brain and nervous system
- relieve anxiety, headaches and fatigue
- lower blood pressure
- improve digestion
- stretch the muscles and connective tissue of the back body
This post will explore Janu Sirsasana, a forward bend that also has elements of a twist.
What Is Janu Sirsasana?
Often called “Head-to-Knee Pose,” I prefer a lesser-known translation from the Sanskrit: “Head-of-the-Knee Pose.” The former implies that the point is to bring your head close to or onto the knee of your extended leg. The latter emphasizes the opposite, bent knee, that grounds and extends, stabilizing your pelvis and creating a more dynamic stretch.
As with all forward bends, it’s important that you fold forward from your hip joints—not your waist. The pelvis and spine should move together. Bending your spine forward while tilting your pelvis back can cause intervertebral disc injury. So, if your hamstrings are on the tighter end of the spectrum, make sure that you always elevate your pelvis on a folded blanket. Bending the knee of your extended leg can also help prevent future back problems. More on this below.
How to Practice Janu Sirsasana
- To practice Janu Sirsasana, sit on a yoga mat, and have a blanket, yoga block and strap handy.
- Sit with your legs outstretched in front of you. Bend your right knee and use your right hand to draw your right foot in toward your right groin. Extend your right knee out to the side, and stretch outward through the right thigh and knee. If your right knee is uncomfortable here, place a yoga block under your thigh to elevate your leg.
- Turn slightly toward your left leg and place your right hand on the outside of your left leg. Rotate your trunk toward your extended leg. Take a few breaths to allow your body to find the twist. This is not a deep twist. You’re simply turning toward the leg enough so that your torso is basically aligned with it.
- Then stretch your sit bones back, fold forward from your hip joints, lengthen both your front and back torso, and extend your torso out over your left leg. Walk your hands along the floor toward your feet. When you have extended forward as far as your hamstrings will allow, then relax your torso, shoulders and neck, folding gently over your leg.
- Breathe deeply, inflating your back body with your inhalation, and allow your body to soften into the pose. Relax and take 5 to 10 deep breaths.
Modifications and Refinements
- To reiterate a very important instruction, when you bend forward, it is important that the action come from the hip joints, not from the spine. You can determine whether your back body is flexible enough to bend forward safely by placing your hand on your low back and feeling your spine while sitting upright with your legs extended out in front of you. If your lumbar vertebrae are poking out, your spine is already flexing, which means you will very likely bend from the spine rather than the pelvis.
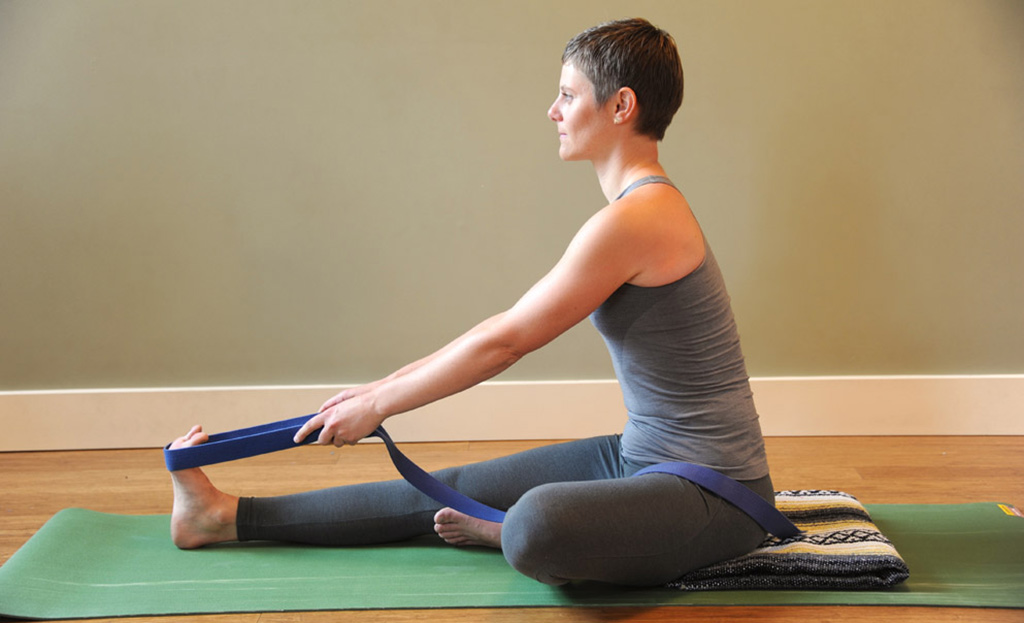
- In this case, place a folded blanket under your sit bones to elevate your pelvis. Test again, and bend forward a little to see if your pelvis is able to lead the action. If one blanket is not enough, you can try two. If two blankets aren’t enough, you can still bend forward—from the pelvis—but rather than allowing your body to curl down, stay upright and loop a strap around your left foot (as in the photo above), then pull gently on your strap with both hands to bring your torso upright. Extend your sit bones back and the top of the pelvis forward.
- While you are in Janu Sirsasana, tune into your intention. Are you striving to move your head closer to your knee (don’t!)? Are you shoulders tight or relaxed? Do you feel as if you are inflicting the pose on yourself or allowing it to unfold naturally? Explore the idea of simply breathing deeply—expanding your back body on the inhalation and relaxing into your pose just as it is on the exhalation.
A Window into the Present
If Janu Sirsasana is to give us a window into ourselves, it can happen only if we are present to the truth of the pose we are currently practicing. When our minds are skipping forward to the pose we believe we should be in, we can’t be at peace in the present. Nothing magical happens when your head touches your knee. The truth resides in this pose, in this moment, not in some concept about what we think a pose should look like. Relax and let Janu Sirsasana give you a window into this moment.
