You won’t often see “fancy” poses featured in this blog. I don’t consider these poses to be staples; they’re more like “dessert.” They’re fun to do occasionally, but aren’t really the main course of yoga practice. The main dishes are the basics, poses like Vrksasana (Tree Pose), Virabhadrasana I and II (Warrior I and II), Adho Mukha Svanasana (Downward Facing Dog Pose) and of course, Tadasana (Mountain Pose). Still, it’s fun to play with fancy poses once in a while. Today I’d like to feature Titibasana (Firefly Pose) and how to prepare for it.
Titibasana is part of the arm balance category of poses. Like Bakasana (Crane Pose) it’s considered to be one of the more basic arm balances. It’s one that has always been accessible to me. But most people find Bakasana to be much easier. Preparation is key.
One of the key elements to practicing Titibasana is arm length. Those of us with long arms are more likely to find this pose pretty easy. But that’s just one element. In order to practice Titibasana, here are elements that need to be in place:
- Long arms
- Strong, flexible wrists
- Stable and active core
- Flexible abductors and strong adductors
Preparing to Practice Titibasana
You can start preparing for Titibasana by practicing a few rounds of Surya Namaskar (Sun Salutations). From there, practice the following poses that address the specific skills you need to practice the pose:
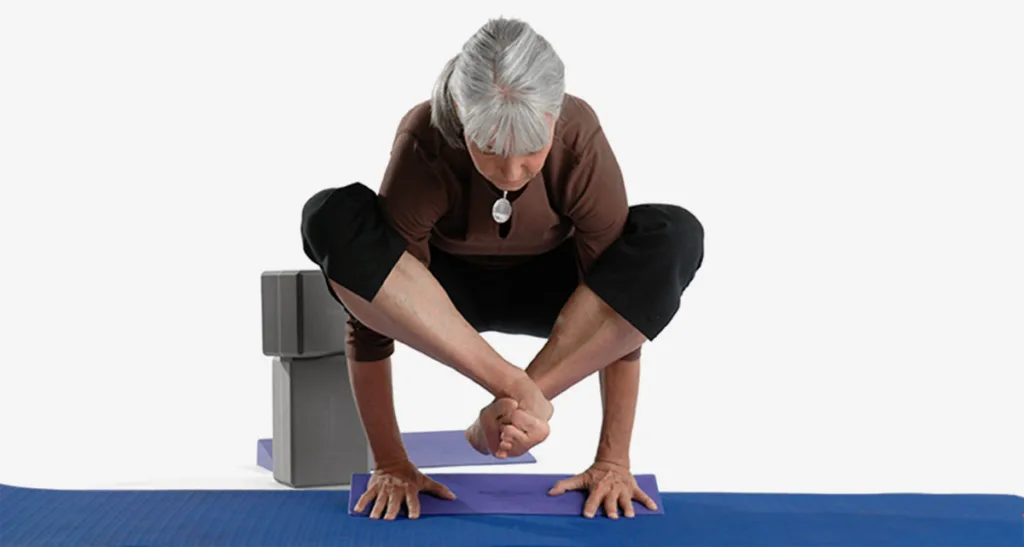
Arms: As for lengthening one’s arms, well, there’s not a lot you can do about that. But you can place Yoga Blocks—on their lowest height—under your hands to effectively lengthen your arms. This has worked well for my students.
Wrists: Titibasana requires extreme flexion in the wrists, along with weight bearing. This makes the pose risky for people with injured or problematic wrists. It’s best not to attempt this pose if your hands or wrists are at all compromised. However, if your hands and wrists are healthy, you can prepare by practicing these “hand yoga” positions. If you find yourself restricted by limited range of motion in the wrists, you can use a Yoga Wedge, as in the above photo.
Core: A strong, activated core may be the most important element in performing any yoga arm balances. Practice a few rounds of Phalakasana (Plank Pose) and Vasisthasana (Side Plank Pose) to warm up. You can also learn the proper action for engaging the core in Malasana (Yogic Squatting Pose). Follow these instructions for the pose: From Malasana, squeeze in on your shoulders with your knees. When you do this, notice how your abdominal muscles and organs tone back toward the back, and the back expands. This toning back is the key to stabilizing your body in arm balances.
Abductors and Adductors: In order to get your knees high up on your arms, your hips have to be somewhat flexible. Warm up the hips by practicing Supta Ardha Padmasana (Reclining Half Lotus Pose) and Gomukhasana (Cow Face Pose). Baddha Konasana (Bound Angle Pose) can help lengthen your adductors.
How to Practice Titibasana
- Begin by standing in Uttanasana (Standing Forward Bend Pose) on a Yoga Mat.
- Bend your knees deeply and walk your hands back so that they are on the floor, behind your feet.
- Bend the knees enough so that your palms can be flat on the floor (or on blocks). Spread your fingers and make sure that your hands are shoulders-width apart.
- Adjust your position so that your knees are as high up on the arms as possible. Then squeeze your knees in on your shoulders so that the core tones back. Maintain this action throughout the pose.
- Begin to gradually shift your weight back, continuing to squeeze in on your shoulders with your knees, until your feet start to feel light on the floor.
- Lift your feet off the floor, placing the soles together. Keep squeezing in on your shoulders.
- At this point, you may find yourself falling back onto your rear. If this happens, you can practice steps 1 through 5 in order to build your technique toward Titibasana, perhaps in the future.
- After a few breaths, gently allow your hips to release down to the floor. Sit and rest for a few breaths. If you want to try again, go for it. Otherwise, practice Downward Facing Dog Pose, followed by Jathara Parivrttanasana (Revolved Belly Pose) to unwind.
Feel free to practice all the steps up to step 6 without ever lifting your feet off the floor. You’ll still receive the core-strengthening, hip-releasing benefits of the pose if you practice all the instructions without lifting your feet off the ground.
Contraindications for Practicing Titibasana:
- Hand or wrist injuries
- Shoulder, elbow or low back injuries
- Recent hip replacement surgery
- Pregnancy
- Menstrual period
- Uncontrolled high blood pressure