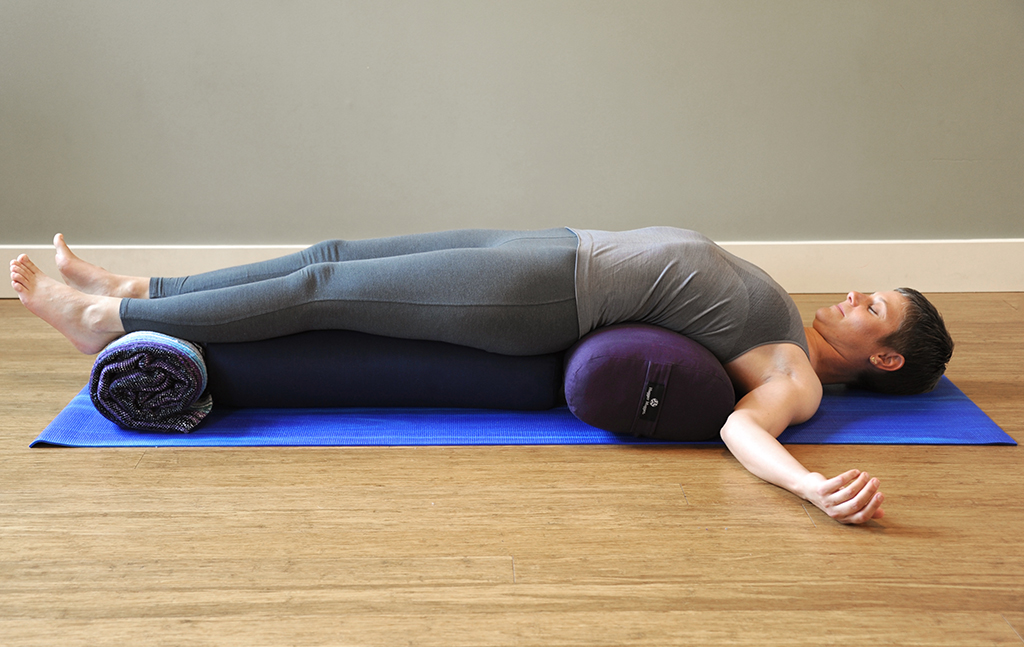
Solstice signals the return of light. Even so, it takes until the beginning of January for the days to start getting oh-so-gradually lighter. So we’re still technically in the thick of the year’s darkest days. While holiday busyness may have subsided a bit, it can’t hurt to follow nature’s trajectory and give ourselves a Restorative Yoga respite each day. A couple weeks ago, I suggested making Viparita Karani (Legs-Up-the-Wall Pose) a holiday season staple. In addition to practicing Viparita Karani, why not add Supported Bridge Pose to your relaxation repertoire?
I practiced in India at the Ramamani Iyengar Memorial Yoga Institute in 1989. During that time, many of us succumbed to various temporary ailments—digestive distress and sore throats/sinus congestion from the polluted city air. (It was easy to see and feel why a functioning EPA is so important!) Salamba Setu Bandha Sarvangasana (Supported Bridge Pose) was their go-to for helping us heal from these maladies.
We practiced Supported Bridge Pose on “Setu Bandha benches.” These wooden benches were long enough to support the lower body and low enough that most people’s shoulders could reach the floor (or a bolster) in the pose. They were more comfortable than you might think. I actually fell asleep on one. But even more comfortable is Judith Hanson Lasater’s setup that uses two Standard Yoga Bolsters and a rolled-up yoga blanket.
How to Practice Supported Bridge Pose
- Gather your props: a yoga mat, two Standard Yoga Bolsters, and one or two yoga blankets. You might also enjoy having an eye pillow handy.
- If you have an extra blanket, spread it out onto your yoga mat so that it covers the mat. If you have only one blanket, save it for use under the ankles in Supported Bridge Pose. This extra blanket just adds a little comfort to an already comfy pose.
- Line your bolsters up, end to end, on your mat, leaving about 15 to 18 inches of head room at the top end of the mat.
- Roll your blanket into a thick roll and place it at the foot end of your bolsters.
- Take a seat on the bolsters and then lie back. Scoot back so that your shoulders and chest hang off the edge of the bolster. Make sure that the tops of your shoulders touch the floor. If your shoulders are not supported on the floor, the weight of your torso can create strain in your low back. On the other hand, make sure that the weight of the body isn’t pouring down into the shoulders. This will happen if your shoulder blades are on the floor. It should be just the tops of the shoulders that rest on the floor.
- Rest your ankles or feet on the rolled-up blanket.
- Make whatever adjustments you need to in order to feel relaxed here. Take a few deep breaths, letting go of tension on your exhalations. Then let go of any effort to breathe deeply and simply allow your body to breathe itself. You can stay for 5 to 20 minutes or longer.
- When you’re ready to leave the pose, bend your knees and roll gently onto your side. Take a few breaths on your side before pushing up to a sitting position.
A Modification
Supported Bridge Pose is a slight inversion. If you don’t invert because of high blood pressure, glaucoma, detached retina or because you are on your menstrual period, try stacking a few blankets at the head end of your bolsters. This will essentially decrease the inversion, and the back arch, so that you’re not quite as inverted. Make sure that both your head and shoulders are supported by the blanket stack, so that your head is not hanging off the edge. This modification is also appropriate for people with shorter torsos.
