Yes, it’s a mouthful. Parvrtta Prasarita Padottanasana (Revolved Wide-Legged Standing Forward Bend) has a complicated name. And maybe that’s fitting. While it may look simple and straightforward, there’s more to it than meets the eye.
The unrevolved version, the slightly more simply named Prasarita Padottanasana, is often considered to be a resting pose. Because of the parallel feet and the forward bending aspect, it can provide a respite between other, more active, standing poses. But the pose can also be energizing, depending on how we approach it.
Parvrtta Prasarita Padottanasana Benefits and Cautions
Both the revolved and unrevolved versions of the pose stretch and strengthen the hamstrings and adductors, and can relieve backaches and headaches. Both variations can tone abdominal organs and calm the brain. However, there are cautions as well. Practitioners with intervertebral disc problems should avoid forward bending and twisting in general.
The first benefit I list above is really important in understanding how to practice the pose in a healthy way. Parvrtta Prasarita Padottanasana’s greatest benefits come when we actively strengthen the hamstrings and adductors while they are stretching. This is one of the gifts of standing poses—they don’t simply stretch or strengthen exclusively. They balance the two qualities. Practicing with the intention of balancing these two qualities can also help to protect our spine.
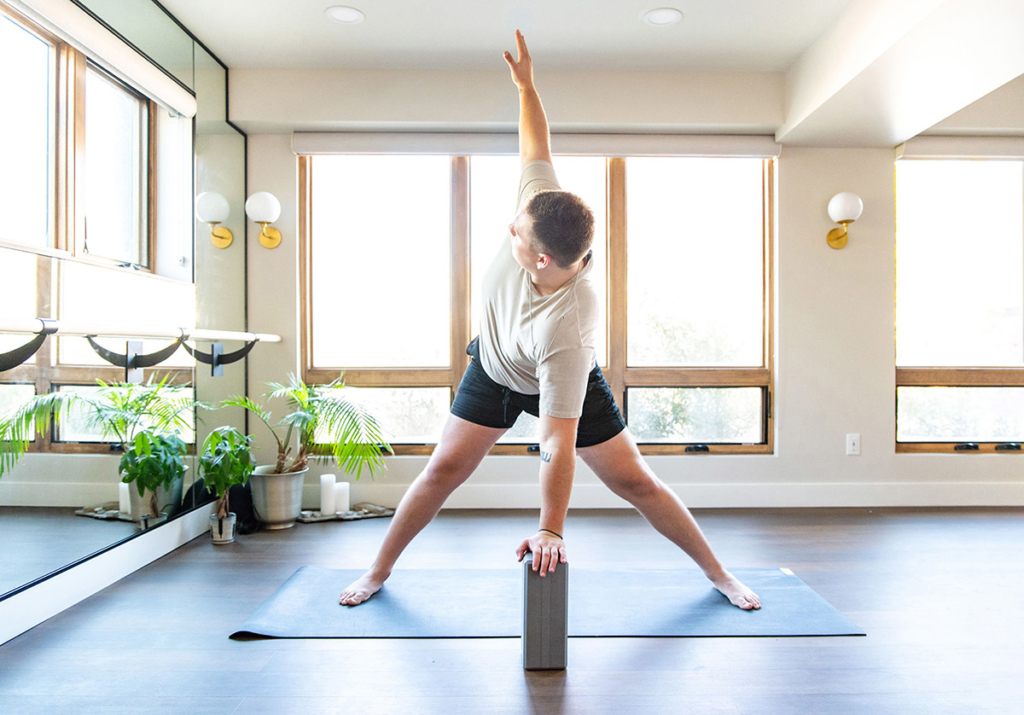
Yoga Blocks for Easy Breathing and a Healthy Spine
These days I recommend that everyone practice Parvrtta Prasarita Padottanasana with a yoga block. I do this for three reasons: (1) to protect students’ spines, (2) to promote healthy breathing and (3) to encourage everyone, including the bendy students, to explore the benefits of using props. As teachers, if we offer blocks only to the less flexible students, they will see themselves as “less than.” Bendier students will see props as “crutches” and will be less likely to use them, even when they could benefit from it.
Since I began suggesting props for everyone in this pose, even my flexible students say they prefer to practice this way. Elevating the bottom hand in this pose promotes elongating the spine, which then promotes freer breathing. For the bendy students, it also prevents them from moving into their maximum end range, which can decrease the strengthening benefits of the pose. In general, hypermobile students need to emphasize strength, rather than pushing their flexibility. Using a block can help them balance their effort.
The great thing about yoga blocks is that they are easy to customize. Each block has three dimensions—low, medium and high—so practitioners can experiment with which height best promotes spinal elongation and free breathing. Taller or less flexible students benefit from using the Big Foam Yoga Block.
How to Practice Parvrtta Prasarita Padottanasana
- Place a yoga block in front of a yoga mat, toward the center. Stand on the center of your yoga mat in Tadasana (Mountain Pose), facing the long edge of the mat.
- Separate your feet a leg-length apart. Turn your feet to approximately parallel. You may find that turning the feet out or in slightly feels more natural for you. Feel free to experiment a bit.
- Activate your legs by grounding through your feet and drawing the muscles up your legs.
- Bend forward from your hip joints, placing your hands on your block. Adjust the height of your block so that your torso is parallel to the floor. It’s very common for people to place the block between their feet or barely in front of them. The block should be the length of your torso in front of your feet. If the block is too close to your feet, your torso will be compressed. So make sure your block is right underneath your shoulders when your torso is parallel to the floor.
- Place your left hand on your block and rotate your torso to the right, placing your right hand on your hip. Reactivate your legs so that you are not leaning onto your block. Your legs should be your primary support.
- Don’t try to square your hips; allow your right hip to be higher than your left hip.
- Keep your head in a neutral position, facing straight ahead. Turning your head can cause neck stress.
- Lengthen your torso and breathe deeply. You can keep your right hand on your hip or extend the arm up toward the ceiling. If you choose to extend your arm, take care not to overextend the shoulder joint. It’s common for practitioners to “throw” the arm back in order to try to twist further. This only stresses your shoulder joint. Make sure you are twisting from your thoracic spine. Then let the arm follow the trajectory of that twist.
- Take 5 to 10 deep breaths here. When you are ready to leave the pose, turn back to the center and rest forward for a few breaths, supporting both hands on your block.
- Repeat the pose on the other side.