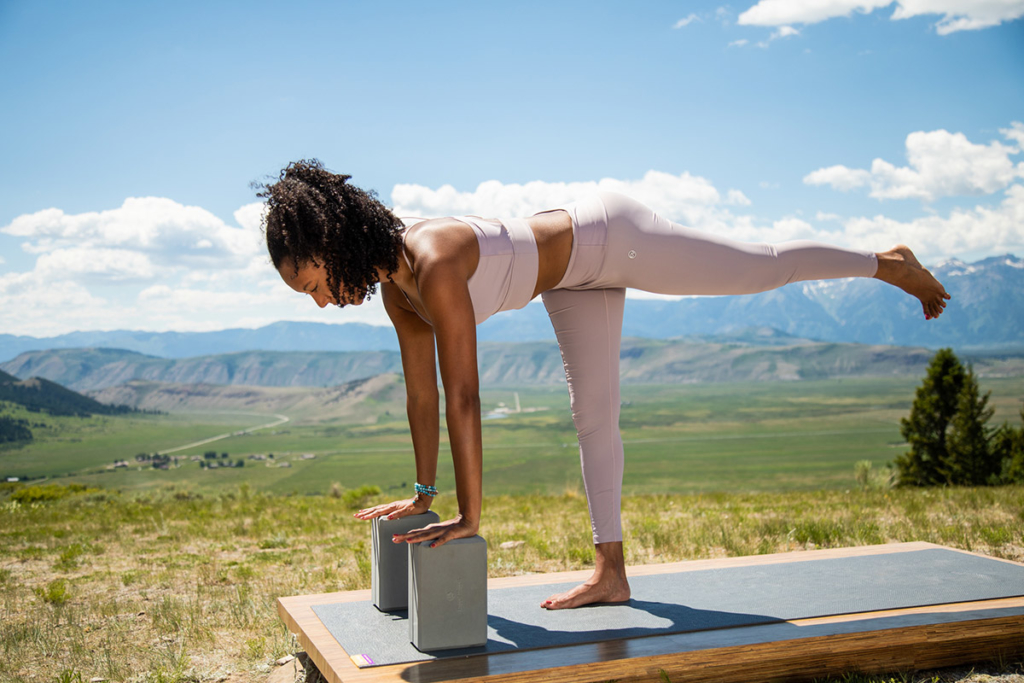
Years ago, I remember a senior Iyengar teacher telling workshop participants that she’d abandoned teaching Virabhadrasana III (Warrior III Pose). “It’s just too hard for too many people,” she said. It’s true that it’s a challenging pose. Leg and core strength can be formidable obstacles. But the most challenging aspect is balancing.
The pose is disorienting, partly because your torso is horizontal rather than vertical. Our vestibular system, the apparatus in the inner ear that gives our brain information about motion, head position and spatial orientation, is in an unfamiliar position in Warrior III. The pose challenges what your body knows about its position in space. The same is true in Ardha Chandrasana (Half Moon Pose). In the latter pose, even though you’re maintaining two points of contact (hand and foot), the pose is often more difficult for practitioners than Vrksasana (Tree Pose). That’s partly because the head is not upright.
In the effort to find balance in this unfamiliar orientation, we often abandon our attention to alignment. (Fear of falling is a powerful motivator.) As a result, misaligning our bodies over our standing leg contributes to further balancing challenges.
Yoga Blocks to the Rescue in Warrior III
In Ardha Chandrasana, I have balance-challenged students practice with their backs against a wall. This gives them the freedom to explore alignment without having to worry about losing balance. In Warrior III, placing blocks under your hands does the same thing. It gives your body two extra points of contact.
When you feel stable in Warrior III, you can tune into more subtle cues from your body. How are you distributing the weight on your standing foot? How is your pelvis oriented in relation to the floor? What’s the angle of your torso?
Even if you’re not struggling to balance, using blocks in this way can be a great teaching tool in your home practice. Finding your most stable alignment is much easier when you’re not worrying about falling.
Why Practice Warrior III?
If this pose is so challenging, why even practice it? Here are some benefits:
- Strengthens the muscles that protect your hip joints, as well as the small stabilizing muscles of the feet and ankles
- Strengthens the core— the back and abdominal muscles
- Improves balance. When you challenge your balance, you also strengthen your ability to balance.
- Improves body awareness as you learn to adjust your own position in space. Challenging your vestibular system strengthens it.
Unlike many physical practices where your body stays in an upright position, yoga is unique in its ability to challenge your vestibular system. Poses such as Uttanasana (Standing Forward Bend), Adho Mukha Svanasana (Downward-Facing Dog Pose), Triangle Pose (Trikonasana), Warrior III, and of course, Sirsasana (Headstand) and Sarvangasana (Shoulderstand) put your head in different relationships to gravity. This helps to strengthen your proprioception, and adds to your balancing skill.
How to Practice
- Stand in Tadasana (Mountain Pose) with your feet hips-width apart on a yoga mat. Place two yoga blocks in their highest setting about two feet in front of you, on the mat. Taller students may want to use two 5-Inch Big Foam Yoga Blocks. (I initially learned to enter Warrior III from Virabhadrasana I (Warrior I Pose). But I feel that it’s easier to start in Tadasana, because you don’t have to shift your weight forward onto your standing leg. You’re already where you need to be in relation to your standing leg.)
- Shift your weight onto your right leg. Then lift your left leg up behind you, allowing your torso to bend forward.
- Once your torso is approximately parallel to the floor, place your hands on your blocks. You may need to move them closer or further away from your standing leg. Your arms should end up in a vertical position.
- Begin to play with your alignment. Here are a few things to think about:
- Check your hyoid bone. In other words, keep your head in a neutral position. Throwing your head back disengages your core muscles. Lengthen the distance between your shoulders and your occiput (the base of your skull).
- Check your pelvic position. Since your standing hip joint is flexed and the top leg is extended, you need not try to “square” your hips. The hip of the back leg can be a little higher than the other one.
- Are you standing squarely over your standing leg? Notice if your standing hip is pushing out to the side. If so, realign it over your foot.
- Is your back leg sagging down? If so, lift it up to engage your glutes.
- Take 5 to 7 deep breaths in the pose, or more if you’re feeling stable and relaxed.
- Lift your torso back to upright, returning to Tadasana. Take a moment to tune into your body. Feel your feet on the floor. How does the sensation in your legs differ from side to side? How’s your breathing?
- Repeat on the other side.
